
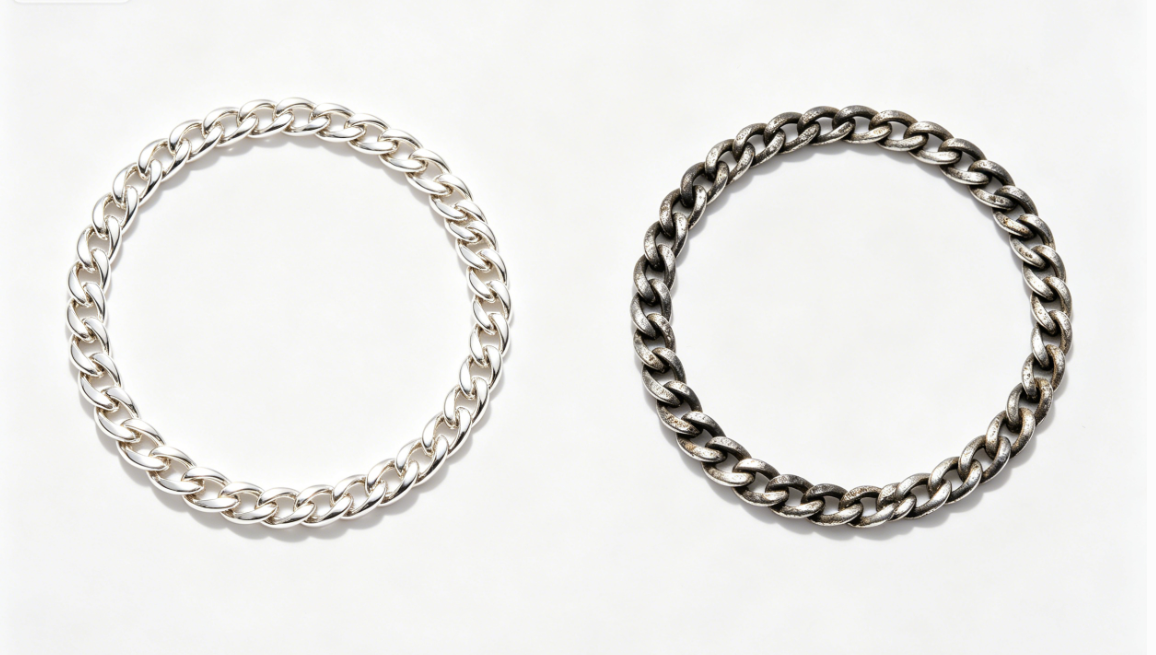
There’s nothing more disappointing than pulling out your favorite silver jewelry—a dainty necklace, a classic ring, or a pair of elegant earrings—and finding it dull, discolored, or even black. You might wonder: Is my silver fake? Did I do something wrong? The good news is, silver turning black is completely normal, and it’s not a sign of poor quality. In fact, it’s a natural chemical reaction that happens to almost all silver pieces over time. The better news? You don’t need to spend a fortune on professional cleaning services or expensive cleaners. With common household items you already have, you can easily clean blackened silver at home and bring back its original luster. In this blog, we’ll break down exactly why silver turns black (spoiler: it’s not “toxins” from your body!) and share proven, safe DIY cleaning methods, plus a handy comparison table and answers to all your most common questions about silver tarnish and silver cleaning.
Why Does Silver Turn Black? The Science Behind Silver Tarnish
First, let’s debunk a common myth: Silver turning black is not a sign that your body is “detoxing.” This misconception likely comes from the old “Silver needle poison test” practice, where silver would react with sulfur impurities in ancient poisons like arsenic, turning black—but that’s not what’s happening with your jewelry today. The real culprit is a chemical reaction called tarnishing, which occurs when silver comes into contact with sulfur compounds.
Most silver jewelry (including popular 925 sterling silver) is not pure silver—it’s mixed with other metals like copper to make it more durable (pure silver is too soft for everyday wear). When this silver-copper alloy is exposed to sulfur compounds in the air, on your skin, or in your environment, a chemical reaction takes place, forming silver sulfide—a dark, dull substance that coats the surface of the silver, making it look black or gray.
Where do these sulfur compounds come from? They’re everywhere:
Air and humidity:
Sulfur dioxide in the air (from pollution, industrial emissions, or even natural sources) reacts with silver over time, especially in humid environments.
Skin oils and sweat:
Your skin naturally produces oils and sweat that contain small amounts of sulfur (from proteins in your body). When you wear silver jewelry, these substances transfer to the silver, accelerating tarnishing—this is why silver worn close to the skin (like rings, bracelets, and necklaces) often turns black faster.
Household products:
Perfumes, lotions, hairsprays, and even some soaps contain sulfur compounds that can react with silver. This is why it’s always best to put on your silver jewelry after applying these products.
Other materials:
Storing silver with materials like cardboard, rubber, or newspaper can also speed up tarnishing, as these items emit sulfur or acidic substances.
The good news? Tarnish is reversible. Unlike rust (which damages metal), silver sulfide is just a surface layer—with the right cleaning methods, you can remove it and restore your silver’s shine without damaging the metal itself.
Comparison Table: Best DIY Silver Cleaning Methods at Home
Cleaning Method | What You Need | Best For | Pros | Cons | Time Required |
|---|---|---|---|---|---|
Soap and Water (Mild Cleaning) | Mild dish soap (ammonia-free), warm water, soft toothbrush, microfiber cloth | Light tarnish, routine cleaning, silver with gemstones | Gentle, safe for all silver types, no harsh chemicals, easy to do | Not effective for heavy tarnish | 5-10 minutes |
Baking Soda Paste | Baking soda, water, soft cloth, microfiber cloth | Moderate tarnish, plain silver (no gemstones) | Effective, affordable, uses common household items, mild abrasive | Can scratch delicate silver if scrubbed too hard; avoid gemstones | 10-15 minutes |
Aluminum Foil + Vinegar Bath | Aluminum foil, white vinegar, warm water, microfiber cloth | Heavy tarnish, plain silver pieces | Fast-acting, no scrubbing needed, restores shine quickly | Not safe for silver-plated items or gemstones; strong vinegar smell | 10 minutes |
Toothpaste (Mild) | White non-abrasive toothpaste, soft cloth, water | Light to moderate tarnish, plain silver | Easy to find, quick, effective for small spots | Abrasive toothpaste can scratch silver; avoid gemstones | 5-10 minutes |
Commercial Silver Polish Cloth | Specialized silver polishing cloth (with cleaning agents) | Light tarnish, routine maintenance, all silver types (including gemstones) | Gentle, no mess, adds a protective layer, portable | More expensive than DIY methods; wears out over time | 2-5 minutes |
Step-by-Step Guide to Cleaning Silver at Home (Safe & Effective)
No matter which method you choose, always start by inspecting your silver jewelry for loose stones or damaged settings—never clean a piece that needs repairs, as water or cleaning agents can make the damage worse. Also, avoid harsh chemicals like bleach, chlorine, or ammonia, as they can damage silver and gemstones permanently.
1. Soap and Water (Gentlest Method)
Fill a bowl with warm water and add 2-3 drops of mild, ammonia-free dish soap (phosphate-free is best).
Place your silver jewelry in the soapy water and let it soak for 5-10 minutes to loosen dirt and light tarnish.
Use a soft toothbrush (like a baby toothbrush) to gently scrub crevices and hard-to-reach areas, especially around gemstone settings.
Rinse the jewelry thoroughly under cool running water to remove all soap residue.
Pat dry completely with a soft, lint-free microfiber cloth—make sure it’s fully dry before storing to prevent future tarnish.
2. Baking Soda Paste (Moderate Tarnish)
Mix 2 parts baking soda with 1 part water to create a thick, smooth paste (adjust ratios if needed).
Gently rub the paste onto the silver jewelry using your fingers or a soft cloth, focusing on the tarnished areas—avoid scrubbing gemstones or delicate engravings.
Let the paste sit for 1-2 minutes (don’t let it dry completely).
Rinse the jewelry thoroughly under cool water to remove all paste residue.
Dry and buff gently with a microfiber cloth to restore shine.
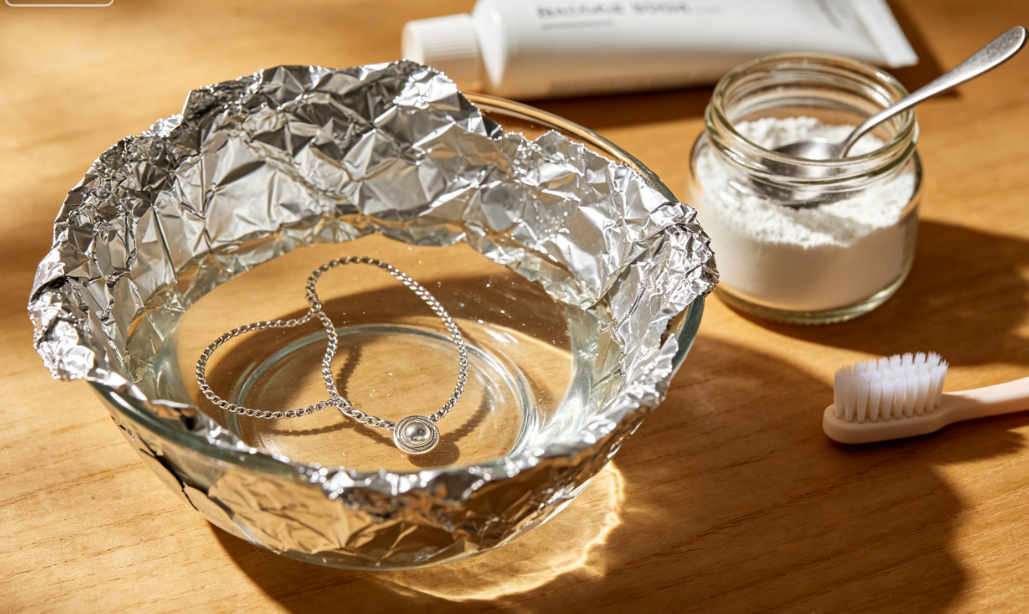
3. Aluminum Foil + Vinegar Bath (Heavy Tarnish)
Line a small non-metallic container with aluminum foil, shiny side up.
Place your blackened silver jewelry on the aluminum foil, making sure it touches the foil directly (this is key for the chemical reaction).
Mix equal parts white vinegar and warm water, then pour the solution over the silver until it’s fully submerged.
Let it sit for 5-10 minutes—you’ll see bubbles forming, which means the reaction is working (silver sulfide is being converted back to silver).
Remove the silver, rinse with cool water, and dry thoroughly with a microfiber cloth.
 FAQ( About Silver Turning Black & Cleaning)